
FAQ/Tips and Tricks
- To place an order online, visit our online catalog, click on the product you want to order and follow the instructions as prompted. If you are an existing customer, be sure to log in. Once logged in, you will be able to see past jobs and order again to save time. If you don’t know your login ID or Password, email order@indigoinkprint.com
- Don’t see what you want in our catalog? To get a custom product price quote, fill a quote request form and follow the instructions as prompted. Remember, the more detail you provide, the easier it is for us to get you what you are looking for.
- If you have already been given a price quote, you can select the “click to order online” button on that quote and follow the instructions as prompted.

- Want to communicate with a Project Manager directly? No problem. Follow the steps below…
- e-mail your file and instructions along with your company/contact info and your P.O. (if required) to: order@indigoinkprint.com
- You will receive a response that we received your e-mail. If you do not receive a response within 1 hour please call us to ensure that we received your e-mail.
- If your file is over 30 mb, please upload the file to our FTP site.
- Email your order specifications and instructions to order@indigoinkprint.com
- Go to “Upload Files”link at the top right corner of our website.
- Click on the “Upload a file” button and follow the prompts.
- The Project Management Team will be notified that a file has been uploaded. Again, it is important if you have not already do so, to email us to let us know you have uploaded your file. This helps us double check that the correct file goes with the correct order request.

These are our standard recommendations for how we will print unless you request something different. We are flexible with our specifications, so if you have something different in mind, just be sure to let your project manager know.
- If your designs have bleed, please include .0625” bleed on each edge.
- We generally recommend keeping any important text or graphics at least .1875” from the edge (like if you have a logo on the back).
- If you have designs with borders, we also recommend having at least .1875” borders.
- If you have designs that print just on the front when folded but the back is white or different color block, we do recommend a .03” overhang past the score line if you would be concerned about having any sliver of white showing when folded. The overhang will have the design wrap around the score line and might hang a little onto the back but most of our greeting card people who are particular about seeing a white sliver prefer that. Without an overhang there is a chance of a white sliver showing on the front.
- Files should be set to CMYK for most accurate output (files can be RGB but colors may shift on press).
- For any special effects, please see our resources for white ink, metallic ink, digital foil and traditional foil for specifications and file set up instructions.

Did you know Indigo Ink also offers sleeving and fulfillment services? Contact us to find out more.
How to set up a Bleed
InDesign or Illustrator
What’s a bleed and why do I need one?
If you want your artwork to go to the edge of your printed piece, you’ll need to set up a bleed. A bleed is printing that goes to the edge of the sheet after trimming. It is part of the background artwork that will be trimmed off after your file is printed and cut to the finished size.
Bleed Settings:
We need a .0625” bleed on each edge.
Our safe zone is .1875” from the edge of the canvas. Keep text and other important items at least .1875” away from the edge of your canvas.

Step 1: Create a new document. Enter your document size and enter .0625” bleed on all 4 edges.

Step 2: Extend the art that you want to bleed to the edge of the bleed zone.
![]()
Step 3: Save your .pdf file with .0625” bleeds.
On the left, click the “Marks and Bleeds” menu.
Check the box “Use Document Bleed Settings”.

6x4_Sample_File PDF
Bleed Set Up File PDF
Digital Flat Foil Compatible Paper Stocks
- Blazer Gloss and Silk Cover
- Mohawk Everyday Digital Cover
- Neenah Classic Crest 100% Recycled Cover
- Neenah Classic Crest Natural White Smooth Cover
- Neenah Dark Stocks 100# Cover – Epic Black, Patriot Blue
- Neenah Environment Desert Storm 100# Cover
- Digi Uncoated Label
Available Digital Flat Foil Colors
- Clear
- Gold
- Silver
- Copper
- Blue
- Red
- Matte Gold
- Matte Silver
- Rainbow Silver
Limitations of Digital Flat Foil
In our extensive testing, we have found that some designs and applications work better than others. While we continue to experiment with ways to overcome these issues, in the meantime, this is the list of things to avoid.
- Avoid thin lines. Lines should be at least 1pt thick.
- Avoid thin, scripty, and small fonts
- No tight registration for Foil(s) + CMYK. You must have at least 1/4” (.25”) distance between foil and CMYK elements.
- We cannot digitally flat foil directly on top of full color print unless we laminate the sheet with a printable soft touch laminate (See instructions for set up in this guide).
- We can print CMYK over top of the Silver foil only.
- No more than one foil color per sheet, unless the second foil is clear gloss foil.
- No mailing addresses in foil (due to USPS limitations)
- We cannot foil on envelopes or large format posters.
- We cannot foil on laminated perfect bound book covers
- We can only foil on one side of a double side laminated piece. If you would like foil on both sides of a laminated piece, we would need to print and laminate two single sided sheets and duplex them together.
- Due to the nature of the process, there is the possibility that the Digital Flat Foil may stick to random spots on the sheet, resulting in small foil specks where otherwise not intended.
Digital Flat Foil Set Up Instructions
Digital Flat Foil Only

- Step 1: Set all foil elements to the spot color “HP Foil” and let us know what foil color you want.
- Step 2: Convert all fonts to outlines
Digital Flat Foil + CMYK or Black (No tight registration or overlapping)

- Light Colored Papers:
- Step 1: Set all foil elements to the spot color “HP Foil”
- Step 2: Make sure all other color is set to CMYK
- Step 3: Convert all fonts to outlines
- Dark Colored Papers:
- Step 1: All CMYK will need a layer of white ink under the CMYK so the ink can stand out against the dark paper. See our white ink instructions to learn how to set up white ink.
- Step 2: Set all foil elements to the spot color “HP Foil”
- Step 3: Make sure all other color is set to CMYK + White Ink per instructions
- Step 4: Convert all fonts to outlines
Reminder – foil and CMYK should not touch or overlap. No close registration. Please allow time for a printed proof.
CMYK printed on Silver Digital Flat Foil (with or without Soft Touch lamination on top)

- Step 1: Set all foil elements to the spot color “HP Foil” and set all foil elements to overprint over top of the CMYK layer
- Step 2: Set all other color to CMYK
- Step 3: Convert all fonts to outlines
Please allow time for a printed proof.
CMYK + Soft Touch lamination with Digital Flat Foil on top

- Step 1: Set up CMYK elements
- Step 2: Set all foil elements to the spot color “HP Foil”
- Step 3: Set all foil elements to overprint over top of the CMYK layer
- Step 4: Convert all fonts to outlines
CMYK + Digital Flat Foil with Soft Touch Lamination on top (no tight registration)
- Step 1: Set up CMYK elements
- Step 2: Set all foil elements to the spot color “HP Foil”
- Step 3: Convert all fonts to outlines
Digital Flat Foil + White Ink
- Step 1: Set all foil elements to the spot color “HP Foil”
- Step 2: Set all white elements to the spot color “HP White 1”
- Step 3: Convert all fonts to outlines
Black Ink Spot Gloss

- Step 1: Set all foil elements to the spot color “HP Gloss”
- Step 2: Convert all fonts to outlines
Spot Gloss on CMYK

- Step 1: Set up CMYK elements
- Step 2: Add a White Ink Layer set to spot color “HP White 1”
- Step 3: Set HP White 1 elements to overprint over top of the CMYK layer
- Step 4: Set all spot gloss elements to the spot color “HP Gloss”
- Step 4: Convert all fonts to outlines
If you have elements that will not have spot gloss, then create an additional CMYK file. This option requires a printed proof due to the nature of the process.
Spot Gloss + White Ink
- Step 1: Set all spot gloss elements to the spot color “HP Gloss” over top of the White Ink layer
- Step 2: Set all white elements to the spot color “HP White 1”
- Step 3: Convert all fonts to outlines
Digital Metallic Ink Set Up
Instructions for Silk Paper
Note: In Illustrator or InDesign, we recommend creating 2 separate layers.
- The first layer is your CMYK design.
- The second layer goes above your CMYK layer. Name it “Metallic” – copy-paste-in-place all elements that should be printed in Metallic Ink on this layer.
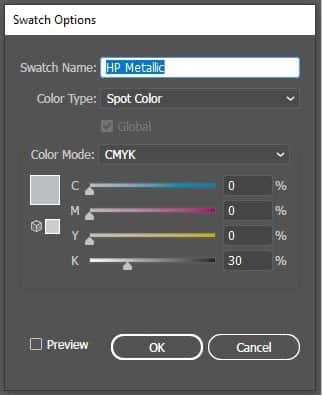
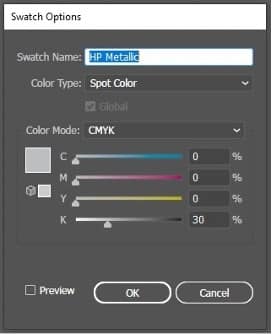
- Step 1: Create a new Spot Color Named “HP Metallic” – that’s HP (space) Metallic. You must name the spot color that exact name or it will not work. Pick any CMYK build for the spot color.

- Step 2: Any elements that will be printed with metallic ink should have a fill or stroke set to “HP Metallic”. These elements will print as silver metallic.Note: If you want to make a metallic color you will need to add metallic ink on top of the CMYK. Ultimately, the silver metallic will print under the CMYK to make a metallic CMYK color. Note – lighter colors work better. Dark colors will not look as metallic as lighter colors. See step 3.
- Step 3: Copy the design element and paste on top of the CMYK and set to the Metallic ink spot color.
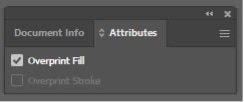
- Step 4: Set all Metallic ink elements to ‘overprint fill’ and ‘overprint stroke’ accordingly (found in the attributes panel in InDesign / Illustrator).

- Step 5: Make sure all PMS and Spot colors are set to convert to CMYK except the HP Metallic Spot color.
- Step 6: Output PDF with Bleeds and Crops.

Instructions for Uncoated Paper
Note: In Illustrator or InDesign, we recommend creating 3 separate layers.
- The first layer is your CMYK design.
- The second layer goes above your CMYK layer. Name it “Metallic” – copy-paste-in-place all elements that should be printed in Metallic Ink on this layer.
- The third layer goes above your Metallic Ink layer. Name it “White” – copy-paste-in-place all elements that should be printed in white on this layer.
- Step 1: Create a new Spot Color Named “HP Metallic” – that’s HP (space) Metallic. You must name the spot color that exact name or it will not work. Pick a CMYK build for the spot color.
 Note: For uncoated stocks, metallic elements need an additional white ink layer beneath them. In your file you will need to add white ink ON TOP of the metallic.
 - Step 2: Create a new Spot Color Named “HP White 1” – that’s HP (space) White (space) 1. You must name the spot color that exact name or it will not work. Pick a CMYK build for the spot color.

- Silver Metallic
- Step 3: Set any elements desired to print as metallic ink to fill with “HP Metallic”. These elements will print as silver metallic.
- Step 4: Copy the metallic ink design elements and copy-paste-in-place on top of the metallic ink design elements (on your white ink layer). Set these elements’ fills and/or strokes to HP White 1 spot color and set to overprint in the attributes window.
- Steps for Metallic CMYK
- Step 5: Create your CMYK design elements
- Step 6: Copy the CMYK design element and paste on top of the CMYK (in your metallic ink layer) and set to the Metallic Ink spot color and set to overprint in the attributes window.Note: Ultimately, the white ink and the metallic ink will print under the CMYK to make a metallic CMYK color. Lighter colors work better. Dark colors will not look as metallic as lighter colors.
- Step 7: Copy the Metallic Ink design elements and copy-paste-in-place on top (in your White Ink layer). Set these elements’ fills and/or strokes to HP White 1 spot color. Set to overprint in the attributes window.
- Step 8: Be sure to set all Metallic Ink and White Ink elements to ‘overprint fill’ and ‘overprint stroke’ accordingly (found in the attributes panel in InDesign / Illustrator).
- Step 9: Make sure all PMS and Spot colors are set to convert to CMYK except the HP Metallic Spot color.
- Step 10: Output PDF with Bleeds and Crops.
 Note: For uncoated stocks, metallic elements need an additional white ink layer beneath them. In your file you will need to add white ink ON TOP of the metallic.
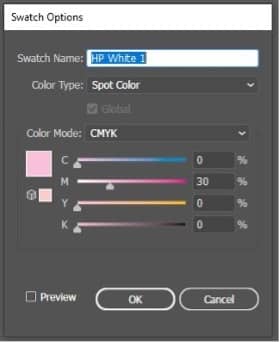
Set Up for Hp Indigo | Set Up for Envelope Press
How to set up a White Ink file for the HP Indigo
White Ink Only

- Step 1: Create a new spot color named “HP White 1” – that’s HP (space) White (space) 1. You must capitalize and name the spot color that exact name or it will not work. You can pick any color build. We suggest 100% magenta, so it is easy to see.

- Step 2: Set all elements to print in white ink to fill with the spot color “HP White 1”.
- Step 3: Output PDF with .0625” Bleeds and Crops.

- That’s it, you’re ready to print!


White Ink and CMYK on a white or light-colored stock

Note: In Illustrator or InDesign, we recommend creating 2 separate layers.
- Name the first layer CMYK. Place your CMYK artwork on this layer.
- Name the second layer White. This layer goes above your CMYK layer. Place your White elements on this layer.


- Step 1: Create a new spot color named “HP White 1” – that’s HP (space) White (space) 1. You must capitalize and name the spot color that exact name or it will not work. You can pick any color build. We suggest 100% magenta, so it is easy to see.

- Step 2: Set any elements desired to print with white ink to fill with “HP White 1”.
- Step 3: Make sure all PMS and Spot colors are set to convert to CMYK except the HP White 1 Spot color.
- Step 4: Output PDF with .0625” Bleeds and Crops.

White Ink and CMYK on a dark stock

When printing a full color image on dark stock, white ink will need to print under the CMYK otherwise the artwork will not show up on the dark stock. Even though white ink will print under the CMYK, you will set up the file so white is on top of your CMYK elements. Once on press, our software will put white under the CMYK. Follow the instructions below to set up your file.
Note: In Illustrator or InDesign, we recommend creating 2 separate layers.
- Name the first layer CMYK. Place your CMYK artwork on this layer.
- Name the second layer White. This layer goes above your CMYK layer. Place your White elements on this layer.
- Step 1: Create a new spot color named “HP White 1” – that’s HP (space) White (space) 1. You must capitalize and name the spot color that exact name or it will not work. You can pick any color build. We suggest 100% magenta, so it is easy to see.
- Step 2: Set any elements desired to print with white ink to fill with “HP White 1”.
- Step 3: Set all areas for white ink on TOP of all other elements (even though it will print underneath).


- Step 4: Set all white ink elements to ‘overprint fill’ and ‘overprint stroke’ accordingly (found in the attributes panel in InDesign / Illustrator).

- Step 5: Make sure all PMS and Spot colors are set to convert to CMYK except the HP White 1 Spot color.
- Step 6: Output PDF with .0625” Bleeds and Crops.

White Ink Opacity Variation

There are creative ways to use white ink to achieve varying levels of opacity. For instance, designing an image with snowflakes, the example shown here. To do this, create different layers, each used to achieve different opacity levels. You can use up to 4 different white spot colors, HP White 1, HP White 2, HP White 3, HP White 4 to vary the opacity/depth of the white. When designing you can stack the white spot colors on top of each other to achieve a more opaque white.
How to set up a White Toner file for Envelope printing
White Toner Only

- Set all items to print as 100% black
- Let us know that everything is to print 100% solid white when you place your order
- Output a .pdf file.
- *If we are printing on your cardstock on our Oki and the artwork has bleeds, output the PDF with .0625” bleeds and crops.
CMYK on a dark stock

- Good News – You don’t have to do anything. Our software will automatically add white toner behind all CMYK elements.
- Output a .pdf file and let us know you want us to print white toner under all CMYK elements.
- *If we are printing on your cardstock on our Oki and the artwork bleeds, output the PDF with .0625” bleeds and crops.
White Toner and CMYK on a dark stock

Note: When printing a full color image on dark stock, white toner will need to print under the CMYK otherwise the artwork will not show up on the dark stock. Even though white ink will print under the CMYK, you will set up the file so white is on top of your CMYK elements. Once on press, our software will put white under the CMYK. Follow the instructions below to set up your file.
Note: In Illustrator or InDesign, we recommend creating 2 separate layers.
- Name the first layer CMYK. Place your CMYK artwork on this layer.
- Name the second layer White. This layer goes above your CMYK layer. Place your White elements on this layer.
- Step 1: Create a new spot color named “SpotColor_White” – that’s SpotColor(underscore)White. You must capitalize and name the spot color that exact name or it will not work. You can pick any color build. We suggest 100% magenta, so it is easy to see.

- Step 2: Set any elements desired to print with white toner to fill with “SpotColor_White”.
- Step 3: Set all areas for white toner on TOP of all other elements (even though it will print underneath).
Envelope before white ink:
 Envelope after white:

- Step 4: Set all white toner elements to ‘overprint fill’ and ‘overprint stroke’ accordingly (found in the attributes panel in InDesign / Illustrator).

- Step 5: Make sure all PMS and Spot colors are set to convert to CMYK except the SpotColor_White Spot color.
- Step 6: Output PDF.
- *If we are printing on your cardstock on our Oki and the artwork bleeds, output the PDF with .0625” bleeds and crops.

 Envelope after white:

Spot Color Set up Instructions
InDesign or Illustrator
- Step 1: Add a New Swatch to the Swatches window

- Step 2: Change the Color Type to Spot Color
- Step 3: Name the Spot Color
- For White Ink: “HP White 1” and set it to be 100% Magenta
- For Digital Flat Foil: “HP Foil” and set it to be 100% Cyan
- For Metallic Ink: “HP Metallic” and set it to be 100% Black

Photoshop
- Step 1: Image > Mode > Grayscale
- Step 2: Image > Mode > Duotone
- Step 3: Change the Type to Monotone
- Step 4: Name the custom Spot Color

- For White Ink: “HP White 1” and set it to be 100% Magenta
- For Digital Flat Foil: “HP Foil” and set it to be 100% Cyan
- For Metallic Ink: “HP Metallic” and set it to be 100% Black

Assigning Spot Channels in Photoshop (PDF) →
How to turn on Overprint
Illustrator
- Step 1: Select text or object that will be overprinting.
- Step 2: Window > Output > Attributes
- Step 3: Check the “Overprint Fill” box. If you have a stroke on your element, check the “Overprint Stroke” box as well
- Step 4: Convert all fonts to outlines
InDesign
- Step 1: Select text or object that will be overprinting
- Step 2: Window > Attributes
- Step 3: Check the “Overprint Fill” box. If you have a stroke on your element, check the “Overprint Stroke” box as well
- Step 4: Convert all fonts to outlines
Photoshop
- Save your Foil file separate from your CMYK file
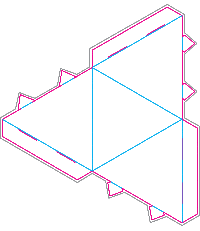
Digital Die Cut and Score Set Up
Indigo Ink can die cut and score digitally without the need to make a traditional die. We can create kiss cut labels, die cut labels, die cut cards, and die cut and scored items like packaging.
- The largest print area for die cutting is 16.5” x 11.5”
- Die cut and score lines should be .5 points thick
How to set up a file for Die Cutting or Kiss Cutting

Note: In Illustrator or InDesign, we recommend creating 2 separate layers.
Name the first layer CMYK. Place your CMYK artwork on this layer.
Name the second layer Die Cut. Place your die line on this layer.

- Step 1: Create your die line around your artwork. If you want your die cut/kiss cut piece to bleed, extend your artwork at least .0625” past the die line.
- Step 2: Set your die line to be 100% Magenta
- Step 3: Output PDF.
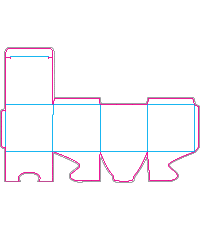
How to set up a file for the Die Cutting and Scoring

Note: In Illustrator or InDesign, we recommend creating 2 separate layers.
Name the first layer CMYK. Place your CMYK artwork on this layer.
Name the second layer Die Cut. Place your die line on this layer.

- Step 1: Create your die line around your artwork. If you want your die cut piece to bleed, extend your artwork at least .0625” past the die line.
- Step 2: Set your die line to be 100% Magenta
- Step 3: Set your score line to be 100% Cyan
- Step 4: Output PDF.
Things to avoid:
- Make sure that there are no clipping masks on the die line layer.
- Make sure the die line is a line and not a fill.
- Remove anything else from the die line layer, including the artwork. The die line will not work if it has any extra information anywhere inside die line layer.
Envelope Set Up and General Guidelines
When it comes to placing an envelope order, there are a few extra details to know about.
Standard Stock and Customer Supplied Stock
We currently carry Regular White txt weight envelopes. Many of our clients prefer to supply their own envelopes, particularly when a specific color or paper substrate is needed. If you are supplying your own envelopes, we recommend the following…
-
-
- Use envelopes with a smooth finish to ensure print quality.
- Provide us with 15% overs (minimum of 5 extra envelopes) for file set up and internal proofing.
- Be sure to provide a PO/Quote # or Job Name with the envelopes (if you are having your envelope vendor send a shipment directly to us, be sure to include this in the PO of that order).
-
Envelope File Set Up
We need a print-ready pdf file. We are not able to print bleeds and do not recommend designs that come close to the edge. The file should be the exact size of the envelope with the desired font in the location, size and CMYK color you want to print. If we are printing double sided, please provide a separate file for the front and the flap.
If we are printing white toner, find detailed instructions for setting up white toner here (be sure to scroll down to “How to set up a white toner file for Envelope Printing”.
If we are printing an envelope liner, please provide an envelope liner cutting guide in the exact same size. We will use this as a template for cutting your liner. Please note that we can only round the point of the flap.

Variable Envelope File Set Up
If you are printing variable address envelopes and would like us to merge the addresses into the print-ready pdf file for you, please
-
-
- send an excel file with the addresses formatted exactly how you want them to print. Note that anything you want to print on a separate line must be in a separate column in the excel file. Also, be sure there is only one line in each cell.
- Send us the InDesign file for the envelope (if able) with the desired font and size in the location and color you want the address to print.
-
We will send a pdf proof of the merged/variable file before printing to ensure accuracy.
(Note: If you have changes to the variable data after the digital proofing has occurred, you must update the excel sheet and send a new file. If there are fewer than 5 changes, please make note of the specific updates).
If you are planning to merge your variable addresses and provide a variable print-ready pdf, directions on how to set up a Variable Data file can be found in our online resources.
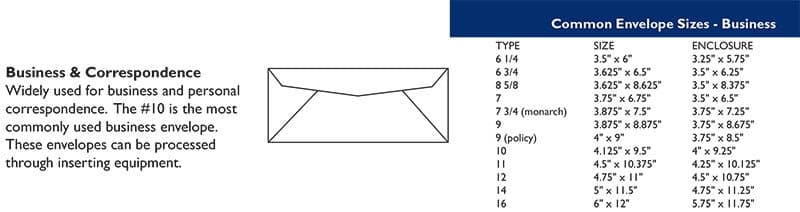
For reference, a chart of the most common envelope sizes can be downloaded from our website here.
Variable Data – InDesign
-
-
- Save your Excel or Google Sheets data file as a .CSV file.
- Each column in your .CSV file should have a header. Name, Address, City, State, Zip
- If your envelope artwork was created using InDesign, open your artwork file and go to step #5
- If your artwork is a .pdf, open InDesign and create a new document
- Format it to be the same size as your PDF document.
- Be sure to include bleeds if your document has them.
- Place your PDF in the new InDesign document.
- Drag and drop your .pdf artwork onto your new document – 0r
- Go to the drop-down menu – File/Place and select your PDF.
- Be sure to center your artwork left/right and top/bottom.
- Open the Data Merge toolbox
- Go to the drop-down menu “Window”
- Select “Utilities”
- Select “Data Merge” and the Data Merge toolbox will open.
- In the upper right corner of the Data Merge toolbox click on the drop-down menu and click “Select Data Source”.
- Choose your .CSV data file.
- Create a text box for your recipient addresses that matches the format you want for the variable data.
- In the data merge toolbox, each header of the .CSV data file will be listed. Map each necessary header to your text box and format as desired.
- In the upper right corner of the Data Merge toolbox click on the drop-down menu and select “Content Placement Options”.
- Select “Remove Blank Lines For Empty Fields”
- Click on the preview button in the lower left corner of the Data Merge toolbox to show your merged data.
- In the upper right corner of the Data Merge toolbox click on the drop-down menu and select export to PDF.
- Before sending your file to us, proof your .pdf file.
- Make any updates needed then send us your final, proofed .pdf file for printing.
- Save your Excel or Google Sheets data file as a .CSV file.
-
Templates
For your convenience, we have provided several small format packaging templates available for download and customization. (Although, for all you creative types, you are always welcome to send us your own designed piece for printing and finishing)
More Templates Available in our Catalog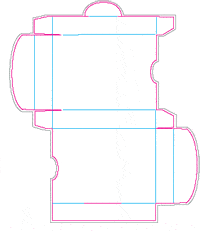


Paper Swatch Book
Need to see the selection of digital paper stocks for yourself? Click below to order a free Indigo Ink Digital Printing paper swatch book!
General Guidelines
Section 1: How to set up a Bleed
Section 2: Steps for Placing an Order
Section 3: Managing my Online Account
Section 4: All Things Envelope
Section 1: How to set up a Bleed
Go to Bleed Set Up
Section 2: Steps for Placing an Order
-
-
- To place an order online, visit our online catalog, click on the product you want to order and follow the instructions as prompted. If you are an existing customer, be sure to log in. Once logged in, you will be able to see past jobs and order again to save time. If you don’t know your login ID or Password, email order@indigoinkprint.com
- Don’t see what you want in our catalog? To get a custom product price quote, fill a quote request form and follow the instructions as prompted. Remember, the more detail you provide, the easier it is for us to get you what you are looking for.
- If you have already been given a price quote, you can select the “click to order online” button on that quote and follow the instructions as prompted.
- Want to communicate with a Project Manager directly? No problem. Follow the steps below…
- e-mail your file and instructions along with your company/contact info and your P.O. (if required) to: order@indigoinkprint.com
- You will receive a response that we received your e-mail. If you do not receive a response within 1 hour please call us to ensure that we received your e-mail.
- If your file is over 30 mb, please upload the file to our FTP site.
- Email your order specifications and instructions to order@indigoinkprint.com
- Go to “Upload Files”link at the top right corner of our website.
- Click on the “Upload a file” button and follow the prompts.
- The Project Management Team will be notified that a file has been uploaded. Again, it is important if you have not already do so, to email us to let us know you have uploaded your file. This helps us double check that the correct file goes with the correct order request.
-
Section 3: Managing my Online Account
To access your account, click on “My Account” on the top menu bar of our website. If you are an existing client and you do not know your user ID, email your Project Manager or order@indigoinkprint.com
Once logged in, you will be able to shop online and see your special pricing, view past orders, check on the status of an existing order, place repeat orders, and pay for invoices.
Check out this blog for extensive details and instructions on how to take advantage of our online features.
Section 4: All Things Envelope
Go to Envelope Set UpWhite Toner Setup Instructions for Envelopes
Sample Files
Click below to download our sample files.
Feather Sample 1
White Ink

Feather Sample 2
Digital Foil

Feather Sample 3
Digital Foil & Black Ink

- IndigoInk_GoldFoil+Black_Bookmark.ai
- IndigoInk_GoldFoil+Black_Bookmark.indd
- IndigoInk_GoldFoil+Black_Bookmark.pdf
Feather Sample 4
Digital Foil & White Ink

- IndigoInk_RedFoil+WhiteInk_Bookmark.ai
- IndigoInk_RedFoil+WhiteInk_Bookmark.indd
- IndigoInk_RedFoil+WhiteInk_Bookmark.pdf
Feather Sample 5
Digital Foil & CMYK

- Energy_COLOR_07.zip (contains embedded image needed for the below files)
- IndigoInk_CMYK+SilverFoil_Bookmark.ai
- IndigoInk_CMYK+SilverFoil_Bookmark.indd
- IndigoInk_CMYK+SilverFoil_Bookmark.pdf
Feather Sample 6
Metallic Ink & CMYK

- IndigoInk_MetallicINK+CMYK_Bookmark.ai
- IndigoInk_MetallicINK+CMYK_Bookmark.indd
- IndigoInk_MetallicINK+CMYK_Bookmark.pdf
Feather Sample 7
Metallic Ink & CMYK & White Ink

- IndigoInk_CMYK+Metallic_INK_Bookmark.ai
- IndigoInk_Metallic INK+CMYK+White_INK_Bookmark.indd
- IndigoInk_CMYK+Metallic_INK_Bookmark.pdf
Feather Sample 8
White Ink Opacity Variations

- Feather-Sample-8_White_Opacity_Effect_on_Epic_Black.indd
- Feather-Sample-8_White_Opacity_Effect_on_Epic_Black.ai
- Feather-Sample-8_White_Opacity_Effect_on_Epic_Black.pdf
Feather Sample 9
Fluorescent Pink

- Feather-Sample-9_Fluorescent_Pink.indd
- Feather-Sample-9_Fluorescent_Pink.ai
- Feather-Sample-9_Fluorescent_Pink.pdf
Feather Sample 10
Fluorescent Pink on Cobalt

- Feather-Sample-10_Fluorescent_Pink_on_Cobalt.indd
- Feather-Sample-10_Fluorescent_Pink_on_Cobalt.ai
- Feather-Sample-10_Fluorescent_Pink_on_Cobalt.pdf
Traditional Foil Sample 1
Traditional Hot Stamp Foil with Die Cut

- IndigoInk_Coaster_Front_Traditional_Foil+Duplex+Diecut_Sample_1.pdf
- IndigoInk_Coaster_Front_Traditional_Foil+Duplex+Diecut_Sample_1.ai
Traditional Foil Sample 2
CMYK + Traditional Hot Stamp Foil

- IndigoInk_Greeting_Card_Traditional_Foil_Sample_2.pdf
- IndigoInk_Greeting_Card_Traditional_Foil_Sample_2.ai
Traditional Foil Sample 3
Traditional Hot Stamp Foil on Envelope

Traditional Foil Sample 4
CMYK + Traditional Hot Stamp Foil Raised Emboss

Art Sample 1
Digital Foil & CMYK

Art Sample 2
White Ink & CMYK on Silver Board

- Solar Surfing_Silver Board + White Ink + CMYK + UV Gloss.pdf
- Solar_Surfing_Silver_Board+White_Ink+CMYK+UV_Gloss.psd.zip
Art Sample 3
Printable Digital Foil & CMYK

Art Sample 4
White Ink & CMYK on Holographic Board

- Jupiter_Holographic Board + White Ink + CMYK + UV Gloss.pdf
- Jupiter_Holographic_Board+White_Ink+CMYK+UV_Gloss.psd.zip
Art Sample 5
Metallic Ink on Coated Stock

Art Sample 6
Metallic Ink on Uncoated Stock

Art Sample 7
White Ink & CMYK on Red Pepper

Die Sample 1
Digital Die Cut Greeting Card

Die Sample 2
Digital Die Cut Coaster

Die Sample 3
Kiss Cut & Die Cut Sticker

Die Sample 4
Score & Die Cut Package
